We were in North Carolina for the last week visiting Dick's family. We had an early 6:30am flight today, direct from Raleigh to SFO.
They started boarding the flight on time, but eventually stopped. At some point, they realized that the plane, which had been sitting at RDU overnight, had two items missing: a trash container (the kind that gets strapped into the galley) and an exit sign for the door by the galley.
Because of this missing exit sign, we could not fly! The airline (United) checked all over our plane, then asked all other airlines at RDU if any of them had an extra Exit sign.
None did.
Instead, they did find an extra Exit sign at the Newark airport, and had that flown on the next flight in from that airport.
It worked, but our flight ended up being 3-1/2 hours delayed - for a missing exit sign.
I get it. I know the airlines have to be really strict with safety and security. Fortunately for us, ours was a direct flight. A lot of people had to work out other flights since they would be missing their connection at SFO.
After we were finally in the air, one of the flight attendants told me that three different airlines had something like this happen on their planes when overnight in RDU over the last month. Some kind of bizarre sabotage?
Anyhow, we made it home, just a few hours late. United apologized for inconvenience and offered free inflight Direct TV to all passengers. That was nice.
The missing sign
The replacement Exit sign- 3-1/2 hours later! (As modeled by our cute flight attendant) :)
Update
I received an email from United Airlines yesterday, apologizing for the flight delay due to maintenance issues.
As a "Goodwill Gesture", I was offered a $250 E-Cetificate for any United Flight! :)
Thank you, United!!
PS: Dick received the same email from them yesterday. When he filled his form out, he was offered $150 flight voucher. We/he was pretty happy with that, until he found out that they offered me $250.
(Christopher says that they must like me more.) ;)
Friday, November 29, 2013
Saturday, November 16, 2013
Moo.
A long time ago (April, 2009 to be exact) my friend, Sheri, sent me a gift card for my birthday. It was specifically to be used at a new (at the time) company called moo.com to have pretty new business cards made. It was a really thoughtful and excellent gift!
Well, I'm embarrassed to say that I never took the time to make those cards - for no good reason, really. I always remembered that I had the gift card, but never got around to doing it...
...until last week!
Actually, it was because of a day at Disneyland with this same friend, Sheri, last week that I was re-motivated! Sheri, and my other friend, Terri reconnected that day. They both live in Burbank, and exchanged cards so that they could stay in contact. It was then that I realize that a) I'm not in the habit of carrying a business/calling card with me, and b) I don't really have a suitable card to give.
Last week, I finally logged onto moo.com and ordered my first set of business/calling cards from them! The process was pretty great - one of the things that moo.com offers that (I believe) is different from most business card companies is that I can submit multiple images to use on the back of the cards. For example, I have 10 images of different paintings that I'd like to feature, one per card. I ordered 100 cards, and have 10 each of each image. The contact info on the other side is the same, and only needed to be entered once.
I received the cards in the mail today, and I'm certainly pleased with the quality of both the card stock, as well as the color images. (color on both sides.) They turned out really nice!
I bought a small, thin business card carrying case that I could keep in my purse. In the past my business cards used to get smooshed and tattered in my wallet. Now that my new cards will have their own little case, they'll be protected and will look much more presentable. :)
Thank you, Sheri, for the Birthday present of 4+ years ago! It went to good use, and I'm thrilled! Sorry it took me so long!
the individual paintings on one side of the cards
the contact side of the card
Thursday, November 14, 2013
"Star Wars -The Exhibition" at the Tech Museum
I spent a wonderfully geeky afternoon with my parents at the The Tech Museum of Innovation in Downtown San Jose. They have a really great Star Wars exhibition showing through late February.
Star Wars: Where Science Meets Imagination(from their website)
Star Wars: Where Science Meets Imagination, presented by Bose Corporation®, was developed by the Museum of Science, Boston in collaboration with Lucasfilm Ltd. and the exhibition makes use of an extensive archive collection on loan from the Lucas Cultural Arts Museum.
We went on a Thursday afternoon, which was great because it was fairly quiet. I understand that they are fully sold out for the weekend, so we feel lucky that we were able to see it without any crowds.
I feel like I've been fortunate to see a few different Star Wars exhibitions before, but none quite like this. They had several models, mostly ships and droids, from all 6 of the Star Wars films. They also had a lot of costumes, props, and some great videos with interviews of behind the scenes.
If you're a Star Wars fan, and you have a chance, I highly recommend seeing this exhibit while it's in town.
with my Mom and Dad at the entrance to the exhibition
the original Millennium Falcon from Episode IV
Han Solo and Chewbacca - I think these were from Episode IV
The Wampa (made for the Special Edition Empire Strikes Back in the late 90s) and an Imperial Snow Trooper
Luke's Landspeeder (and a model which was used for distance scenes) from Episode IV
My Mom at one of the hands-on booths - she was trying to drive over a forced air floor - simulating a landspeeder on Tatooine
Darth Vader's Suit - I think this was from Episode III
All kinds of droids - all of which I had in my action figure collection! The interrogator droid (Episode IV) and the two medical droids from Episode V
Blasters and lightsabers - most of these were from Episodes I-III
Princess Leia's costume, R2-D2 and C3-PO
Yoda and a Jedi Training Remote (Episode IV)
An Imperial All Terrain Scout Transport and a small-scale AT-AT
A naked C3-PO (Episode I) and the Imperial Probe Droid
We paid for the special "Millennium Falcon Experience" where they take 4 people at a time into the cockpit of the Millenium Falcon to show a short film about space (we jumped to hyperspace several times!)
Wednesday, November 13, 2013
"Taxi" painting, Session 2
I had my second session of painting "Taxi" today. Dean suggested that I should first paint it all monochromatic so that I could focus on the development of the entire image without being distracted by color early on. I think it was very helpful, as I was able to concentrate on shapes and tones, and also make sure that the lines and perspective stayed intact.
Right now, I think it's looking a whole lot like a graphic novel (or an A-ha video!). :) Between the monochromatic tones, the perspective, and the sharp lines. It's certainly unlike anything I've ever painted before!
I'm still working on just covering the canvas. There are so many small components that are important, I want to make sure that I'm not covering any of it up by accident. I also find that my method of painting this image is different than most others. I'm really painting by concentrating on small and large blocks of color and tone, rather than looking at it as one large image. I've only ever done this method once before, on the Chinatown painting. It's a fascinating process to go through - I'm focusing on individual color blocks, but when I step back, and I can see how they all fit together and for a cohesive image. So cool.
I got almost all the canvas filled by the end of my session today. There are still a few small spots. Eventually, I'll need to soften many of the lines, as they are all so stark and hard. Once I soften it, it'll do away with the Graphic Novel look. :)
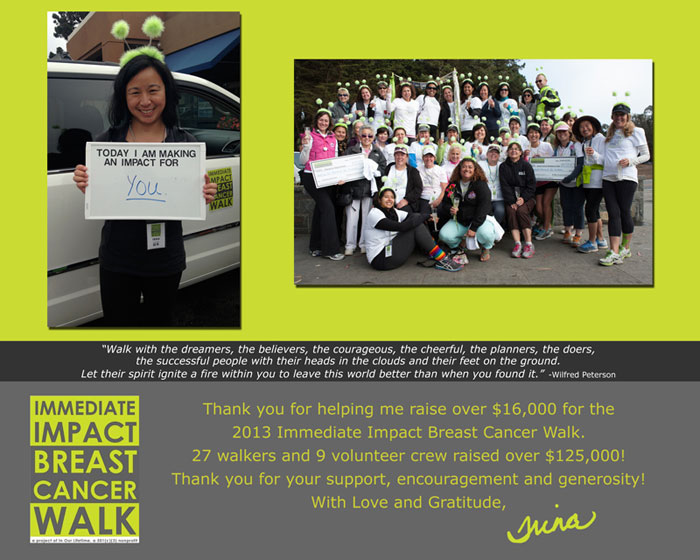
2013 Immediate Impact Walk - My Thank You Card to my Sponsors
This is the Thank You Card that I made and sent out to everyone who sponsored me for the 2013 Immediate Impact Breast Cancer Walk. I had already sent out a Thank You over email, but always think that it's nice to send a card in the postal mail, too. (Because, isn't it always nice to receive a card in the mail?)
I created and sent these out about a week and a half ago, so I assume everyone has received them by now. I like to wait a few days before posting on my blog, so everyone can be a little surprised when they receive it in the mail. :)
Tuesday, November 12, 2013
New Bed = Better Sleep!
Dick and I bought a new bed on Sunday. It's been about 14 years since the last time we bought a mattress, and oh, how they've changed!
Granted, last time, we went to a Macy's. This time, we went to Sleep Train, an actual mattress store, so we learned a lot more about what our options were this time.
After much debating, we ended up deciding on a Temur-Pedic Memory Foam mattress. It's quite different from the more traditional coil mattress that we're accustomed to. I actually, loved the memory foam immediately, but it took Dick a little more convincing. Bottom line was that Sleep Train offers a guarantee that you can return/exchange it within 90 days, if you don't like it. We figured we'd give it a try, and go from there.
The other big decision was that we decided to buy an uber-cool Ergo Base, meaning an adjustable bed! Now, I know that it sounds like a hospital bed, and terribly geriatric (which is probably true) but it's pretty awesome! Frankly, I didn't know that these things exist for home use - apparently, they are quite popular. The sales person explained to us that if you sleep with your feet slightly elevated, it will help with circulation, and help to keep your body from overheating. Also, if you sleep with your upper torso slightly raised, it will help with your breathing. All good things!
We placed our order on Sunday early evening, and it was delivered yesterday afternoon! (great service, all around for Sleep Train, by the way!)
Here are some photos of the early set-up:
The "Ergo Plus Base", which is the most basic. It has a remote to adjust the head and foot of the bed. Other options on the fancier models included a massage system, which didn't really do much for us, so we opted out
The Tempur-Pedic Mattress (with mattress protector) on top of the base. Totally geriatric looking, I know
Our bed is all made up (without the decorative pillows) and shows a slight elevation of both the head and foot of the bed
So, last night was our first time sleeping on it.
How was it?
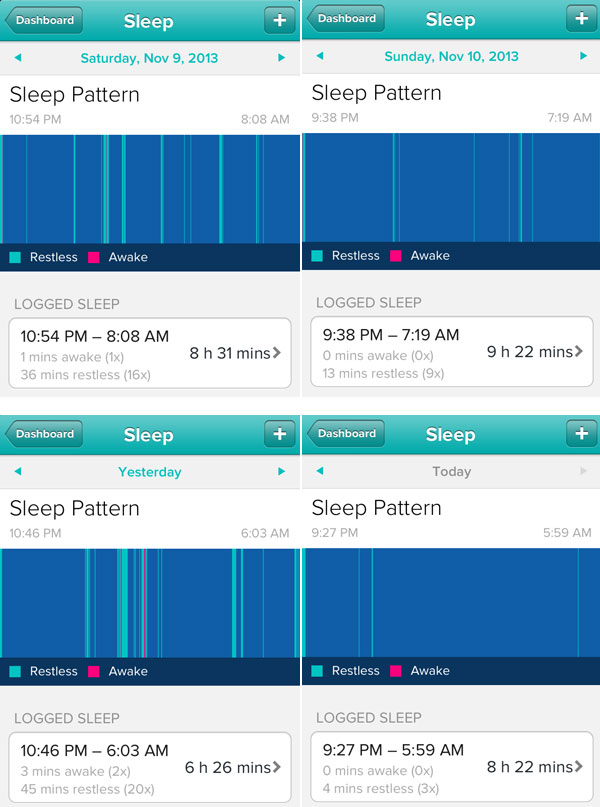
My fitbit monitors my sleep patterns each night (time I go to sleep, time I wake up, and how often I wake up, or am restless throughout the night). I think a picture (or, in this case, four) speaks a thousand words. Here are the graphics from my sleeping pattern for the last four nights:
sleeping pattern of the last four nights
You can see that I had a much more restful night sleep last night than I had during the three previous nights. I'm not saying that this will happen every night, but if it's the trend with the new mattress, I'll be very happy! When I woke up this morning, I felt VERY rested, and recognized that it was the best night's sleep I've had in a while. (As advertised!)
You may have also noticed that I require a lot of sleep. Yep, 8-10 hours, when I can. It makes a big difference to me. :)
So, there you go: new bed success!! This was only the first night, of course, so I'll be interested in seeing how it all progresses.
Saturday, November 09, 2013
Dinner with the Family
It's not often that the six of us get together for a meal, so I thought it was worth documenting. (Dick took this photo, so unfortunately, he's not in the shot.)
We all got together in Milpitas together for a quick visit this afternoon, then had an early dinner at our favorite Mexican restaurant, Baja Cactus.
Thanks, Mom and Dad for a delicious dinner together!!
We all got together in Milpitas together for a quick visit this afternoon, then had an early dinner at our favorite Mexican restaurant, Baja Cactus.
Thanks, Mom and Dad for a delicious dinner together!!
Wednesday, November 06, 2013
Vacation of Visiting Friends, Part 6: Sherilyn! Day One at the Mouse's House
The 6th, and final visit on my Vacation of Visiting friends from the last 19-38 years is with my friend, Sherilyn, who I call Sheri, or simply, Bear. We've been friends since 8th grade, which was our one and only year in Junior High School. Well, technically, we originally met in 6th grade at Jill Freeman's slumber Birthday party, and we totally hit it off, but we didn't really get to know each other until we went to school with each other from 8th through 10th grade.
The thing about Sheri and I is that we laugh all the time when we're together. It doesn't take much, but we always seem to have the case of the giggles when we're together. Always have, always will. She lives down in Burbank now, and has lived in Southern Cal ever since she left Milpitas after our Sophomore year in High School. We had lots of lots of classes together. She was the friend who I always passed notes to and from in class. Somehow, we never got in trouble. Well, I suppose that's because we were good students, who didn't really ever do much to get in trouble. Sheri is very bright, and extraordinarily well-rounded: she works as an engineer, a writer, and a poet. Oh, and she's also a Roller Derby Referee. She's got it all going on.
Plus, she's terribly funny. Did I mention how much she makes me laugh?
Sheri and I drove early from Burbank down to Anaheim this morning. We're going to spend a total of two days together at Disneyland and California Adventure. Coincidentally, Terri and her family also spent the day at Disneyland today, which was wonderful! We were able to connect with them several times, went on a few rides together (a group of 8 of us!), and had lunch and dinner together. The whole thing just made my heart so happy.
Apparently, the first week of November is the perfect time to come to Disney. We never waited for more than 10 minutes to get onto any ride. The newest and most popular ride, Radiator Springs at California Adventure was, unfortunately, closed both days that we'll be here. bummer. Other than that, we were able to get onto each and every ride in record time. We rode all the major ones today in both parks, including going back to Star Tours three times (each time different) and two back-to-back rides on the Haunted Mansion, which I was thrilled to see was still decorated (through Christmas, apparently) for The Nightmare Before Christmas. I had heard that they've been doing this for several years, but never made it down to Disneyland during the Halloween season. I had always assumed that they just put a few decorations up, inside and outside the mansion. It turns out, the completely transform the entire ride! It was ridiculously cool to be on a ride so familiar, yet totally different, and not know what to expect.
Thank you again to Derek and Terri for helping us get tickets today, and for sharing your family vacation with us! We had a wonderful time together!! Looking forward to one more day of Disney tomorrow!!
Trina and Sherilyn in front of Sleeping Beauty's Castle
Connecting with the Alff Family (and friends)
Terri, with her Yoda backpack
A perfect day in Anaheim
Just one example of the short lines at the park today. This was the line wait time for Star Tours - 5 minutes. Mostly, it meant that it would take 5 minutes to walk to the front of the line.
"It's a Small World" was closed (unfortunately for us) so they could decorate it for the Holidays
The Haunted Mansion was still decorated for Halloween/Nightmare Before Christmas (lucky for us!)!
the front of the Haunted Mansion
Inside the ride - the background as you board the ride
It's Jack Skellington and Zero!
Sally, saying goodbye to us at the end of the ride
Sherilyn's cool new R2-D2 Mouse Ears
Our party of eight filled an entire row of Star Tours
our final score on the Buzz Lightyear ride
California Adventure at night, waiting for "World of Color" show.
Tuesday, November 05, 2013
Presenting: The World's Only R2-D2 Crock Pot!
Crock Pot Pop Art. You heard it here, first. ;)
This may be the funniest thing that I've done in a while...
Yesterday, when I was at Terri and Derek's house, I spied a crock pot sitting on the corner of their kitchen counter. What was most interesting was that it was a round Crock Pot with an R2-D2 head.
the original crock pot with an R2-D2 head
I should mention here that Terri and Derek (and their kids!) are Star Wars fanatics. Terri and I both loved Star Wars growing up, but Terri has taken it several additional levels. For example, Terri and Derek had a Star Wars wedding!!! (no, they didn't dress in costume, but Terri did march down the aisle to the Star Wars march from the end of Episode IV.) They also had the action figures of C3-PO and R2-D2 standing on the top of their wedding cake as their cake topper. I could go on and on. It was fantastic, and really suited them well.
Anyhow, I complimented Terri on her cleverness of putting a plastic R2-D2 bowl on top of the crock pot. Brilliant. She told me that she had always wanted to paint the crock pot as R2-D2, but had no idea how to do it.
Well, I had no idea how to do it either, but I volunteered right then and there on the spot. I figured I could go to the Michael's craft store, try to find some sort of heat-resistant paint, and I could just paint it on for her. I mean, it was certainly worth a shot, right?
So, I went to Michael's and asked a friendly employee if they had any heat-resistant paint that I could use to paint an R2-D2 crock pot. He thought it was a great idea, but didn't really have any suggestions. Originally, I thought we could use ceramics paint (because ceramics are fired in a kiln at very high temps after painted) but they didn't have any. Really?
Eventually, I found some tubes of Enamel paint which said that they could be used on porcelain then baked in a 325 degree oven. That sounded pretty heat-resistant to me. I figured it was our only option, and worth a shot.
I checked online for a reference photo to see which paint colors I would need. Luckily R2-D2 is pretty basic. I only needed to buy white, blue and silver.
R2-D2 Reference photo
the bottles of glossy enamel paint that I bought in White, Blue, Silver and Clear
We did a test patch on the back of the crock pot to see if the white paint would cover over the pattern already on the crock pot. We discovered that the paint was quite thin, but that it would work if I used several layers. I also figured out that if we turned the crock pot on while I painted the white that the paint would dry faster and that it would "bake" the color in. We figured that if this worked, then it should be okay to actually use the crock pot for cooking. (meaning, the paint wouldn't peel off, or fade, or whatever.)
We turned the crock pot on, and I applied layer upon layer of white paint. Eventually, the multiple layers became opaque enough that the colors and patterns of the original crock pot were covered.
covered in layers of white
Next, I used my reference (Terri just happens to have dozens of Star Wars books in her house) to draw in the pattern with a pencil.
The Droid Guide Book
pattern drawn in pencil
The next step was to use a silver sharpie pen to outline the pattern. At this point, I figured that there was a solid layer of white Enamel paint protecting the original surface of the crock pot, so I *think* it's okay to use a Sharpie Marker.
Terri documented the step-by-step of the transformation. Here I am drawing with the silver Sharpie marker
The pattern outlined in silver Sharpie Pen.
Next, I started to add the blue. I painted in the blue areas with a paint brush. It took a few layers to get it opaque enough.
more blue!
After painting the blue and silver areas, Terri turned the crock pot back on for a while to let those colors bake in.
This morning, I returned and re-outlined all of the silver lines outside of the painted areas to clean it up a bit.
the final product! The World's First R2-D2 Crock Pot!
One of my favorite parts of the R2-D2 Crock Pot is that the On/Off knob of the crock pot is in the same place as a circular plug on the original R2-D2 design! Nice coincidence!!
This evening, I put on a few layers of a clear glossy paint hoping that it would heighten the glossiness a bit. It was still drying when I left, so I hope it turns out!
I'm really thrilled that our crock pot painting experiment turned out!! We'll find out how it survives it's first usage after Terri uses it to make cider at Thanksgiving!
I'm really glad that we ran with our little experiment. We were both laughing so much when I was painting it. What a great and fun idea!
Enjoy your new and improved crock pot art, Terri!! I had a blast painting it, and I'm so glad we were able to do this fun projet together!! xo
This may be the funniest thing that I've done in a while...
Yesterday, when I was at Terri and Derek's house, I spied a crock pot sitting on the corner of their kitchen counter. What was most interesting was that it was a round Crock Pot with an R2-D2 head.
the original crock pot with an R2-D2 head
I should mention here that Terri and Derek (and their kids!) are Star Wars fanatics. Terri and I both loved Star Wars growing up, but Terri has taken it several additional levels. For example, Terri and Derek had a Star Wars wedding!!! (no, they didn't dress in costume, but Terri did march down the aisle to the Star Wars march from the end of Episode IV.) They also had the action figures of C3-PO and R2-D2 standing on the top of their wedding cake as their cake topper. I could go on and on. It was fantastic, and really suited them well.
Anyhow, I complimented Terri on her cleverness of putting a plastic R2-D2 bowl on top of the crock pot. Brilliant. She told me that she had always wanted to paint the crock pot as R2-D2, but had no idea how to do it.
Well, I had no idea how to do it either, but I volunteered right then and there on the spot. I figured I could go to the Michael's craft store, try to find some sort of heat-resistant paint, and I could just paint it on for her. I mean, it was certainly worth a shot, right?
So, I went to Michael's and asked a friendly employee if they had any heat-resistant paint that I could use to paint an R2-D2 crock pot. He thought it was a great idea, but didn't really have any suggestions. Originally, I thought we could use ceramics paint (because ceramics are fired in a kiln at very high temps after painted) but they didn't have any. Really?
Eventually, I found some tubes of Enamel paint which said that they could be used on porcelain then baked in a 325 degree oven. That sounded pretty heat-resistant to me. I figured it was our only option, and worth a shot.
I checked online for a reference photo to see which paint colors I would need. Luckily R2-D2 is pretty basic. I only needed to buy white, blue and silver.
R2-D2 Reference photo
the bottles of glossy enamel paint that I bought in White, Blue, Silver and Clear
We did a test patch on the back of the crock pot to see if the white paint would cover over the pattern already on the crock pot. We discovered that the paint was quite thin, but that it would work if I used several layers. I also figured out that if we turned the crock pot on while I painted the white that the paint would dry faster and that it would "bake" the color in. We figured that if this worked, then it should be okay to actually use the crock pot for cooking. (meaning, the paint wouldn't peel off, or fade, or whatever.)
We turned the crock pot on, and I applied layer upon layer of white paint. Eventually, the multiple layers became opaque enough that the colors and patterns of the original crock pot were covered.
covered in layers of white
Next, I used my reference (Terri just happens to have dozens of Star Wars books in her house) to draw in the pattern with a pencil.
The Droid Guide Book
pattern drawn in pencil
The next step was to use a silver sharpie pen to outline the pattern. At this point, I figured that there was a solid layer of white Enamel paint protecting the original surface of the crock pot, so I *think* it's okay to use a Sharpie Marker.
Terri documented the step-by-step of the transformation. Here I am drawing with the silver Sharpie marker
The pattern outlined in silver Sharpie Pen.
Next, I started to add the blue. I painted in the blue areas with a paint brush. It took a few layers to get it opaque enough.
more blue!
After painting the blue and silver areas, Terri turned the crock pot back on for a while to let those colors bake in.
This morning, I returned and re-outlined all of the silver lines outside of the painted areas to clean it up a bit.
the final product! The World's First R2-D2 Crock Pot!
One of my favorite parts of the R2-D2 Crock Pot is that the On/Off knob of the crock pot is in the same place as a circular plug on the original R2-D2 design! Nice coincidence!!
This evening, I put on a few layers of a clear glossy paint hoping that it would heighten the glossiness a bit. It was still drying when I left, so I hope it turns out!
I'm really thrilled that our crock pot painting experiment turned out!! We'll find out how it survives it's first usage after Terri uses it to make cider at Thanksgiving!
I'm really glad that we ran with our little experiment. We were both laughing so much when I was painting it. What a great and fun idea!
Enjoy your new and improved crock pot art, Terri!! I had a blast painting it, and I'm so glad we were able to do this fun projet together!! xo